The email signup form: no email marketing strategy is complete without one. If you want to grow your email list (and who doesn’t?!), you need a compelling form in all the right places. Want to make the most of this simple yet powerful tool? We show how.
First things first: it helps to understand why the signup form is so important. You’re just asking for an email address, so what’s the big deal?
Actually, there is something quite special about users who subscribe via your form.
These are people who have read your content, liked what they saw, and want more of the same. They have actively decided to join your mailing list. They are engaged and interested in what you have to say. These are exactly the kind of contacts you want.
Most engaged means most likely to convert – and a signup form is how you’ll get them.
What makes a good signup form?
There are certain things an email signup form can and should do:
- Make the signup process as simple as possible: The user should be able to subscribe to your newsletter in a matter of seconds.
- Create a positive first impression of your brand: A lackluster, buggy or over-complicated form will make the user think twice about providing their email address.
- Provide you with audience insights: The signup form can be a good opportunity to learn about your subscribers and their interests, but don’t overdo it. Remember, simplicity rules.
The 4 crucial elements of a successful email signup form
Building the email signup form is only one part of the process. For optimal results, we strongly recommend following these 4 steps:
- Build the form using a form builder tool: This should already come with your email marketing software. If you’re using Sendinblue stay tuned because we’ll be detailing this process further down.
- Implement a double opt-in email: This is an automatic email sent out to new subscribers with a link to confirm their email address. This is a great way to prove subscriber consent (super important for GDPR) and to ensure that the email address was entered correctly.
- Place the signup form in strategic locations: Add the form to your website or social media profiles, link it in your emails, or add it as a widget to your CMS using a plugin (like the free Sendinblue WordPress plugin available for download here).
- Set up an automated welcome email as a means of greeting new subscribers and getting the relationship off to a good start.
So you know you need a form, and you know it needs to make an impact. Ready to make it happen? Let’s go step by step through the form creation process using the Sendinblue Signup Form feature..
Step 1. Create a email signup form with Sendinblue
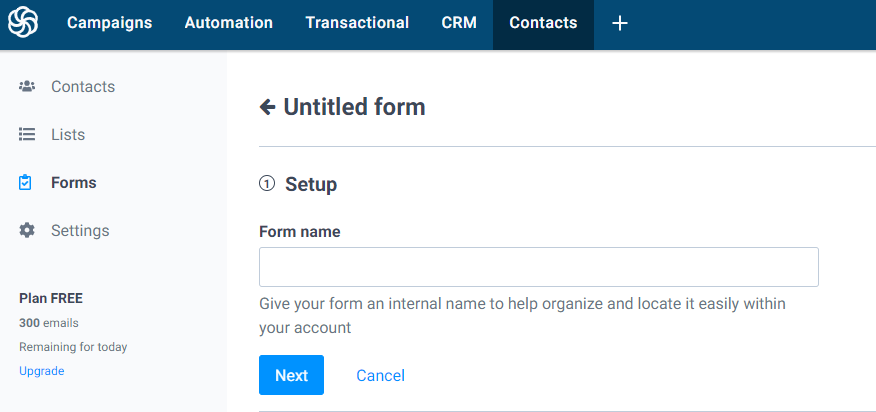
Navigate to the Contacts tab on the Sendinblue platform and click Forms in the column on the left.
Now hit the Create your first subscription form button.

Give your form a name so that you’ll be able to find it within your account.

Step 2. Design the form
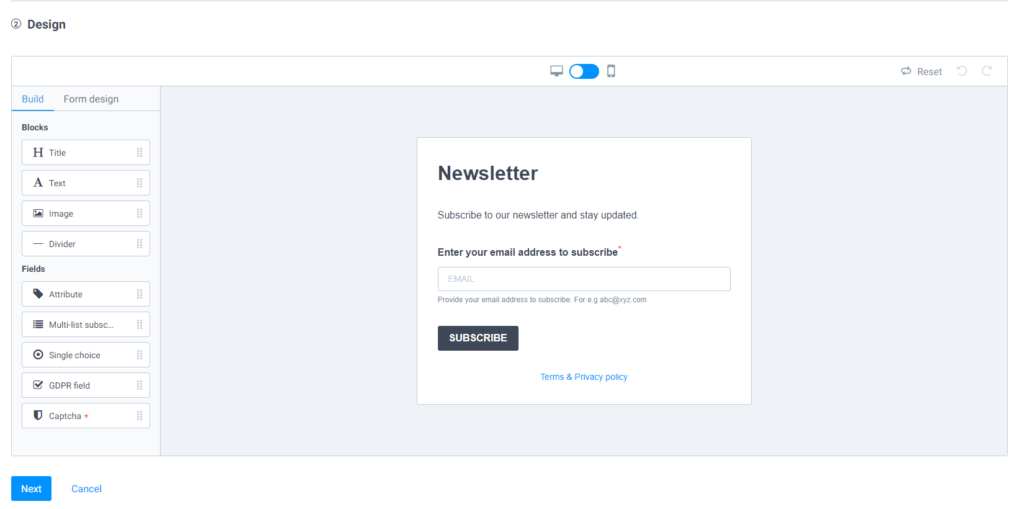
Sendinblue lets you personalize various elements of the signup form including the background, text (font, size, color), the form fields, the call to action text, and the success message (confirming that a user has successfully subscribed).
Design the form by simply dragging and dropping the required content blocks (e.g. title, text, image, divider) onto the form body and rearranging them as necessary.

Those using the Sendinblue email editor will already be familiar with the Drag & Drag process. If it’s your first time, not to worry. It’s super easy. 🙂
After that you’ll be able to customize the finer details such as the text font, form width, button color, and much more.
Design Tip When it comes to design, think clean and minimal. Stick to one single column; multiple columns only serve to make the newsletter subscription process appear lengthier and more confusing than it really is – a surefire way to deter potential subscribers. Keep your form free of clutter and don’t go overboard on the text.
It’s also important to consider the order in which your fields appear. The email address field is undoubtedly the most important, so make sure this – and your CTA – both stand out.
Insert the content & call to action
Your signup form is an extension of your brand, so wording and tone are crucial. If your website is formal and businesslike, the signup form should mirror this. If your overall branding is more lighthearted, your form can be a little more tongue-in-cheek.
Another thing about language: be clear and concise. Leave the user in absolutely no doubt as to what they should do next (enter their email address!) and where.
Especially important is the CTA. Don’t just furnish your button with a generic “Subscribe”; talk in terms of benefits. Tell the user what they stand to gain by subscribing to your newsletter. For example: “Yes, I want all the latest updates” or “Grab my 10% discount”. Much more convincing, right?
Choose the fields to be included on the form
Next, think about the fields you want to include. The email address field is a must, but you may also wish to gather a bit more information about your new subscribers by adding contact attribute fields. Things like name, date of birth and location can be extremely useful when it comes to personalizing your emails and segmenting your audience.
However, user experience should take priority here. If they have to manually enter too many details, they may abandon the process altogether.
If you do decide to add more fields, pick just a few and make them optional. This way, the user can skip them if they want to, and you still get that all-important email address. You can always build up user profiles later: the number one priority at this stage is to get them on your email list.
You may also add a multi-list subscription field to allow subscribers to declare interests or preferences at signup and place them in corresponding lists.
Step 3. Choose a contact list
Choose one or more lists into which your new subscribers will be saved. You can also create a new list.

Step 4. Set up a confirmation email
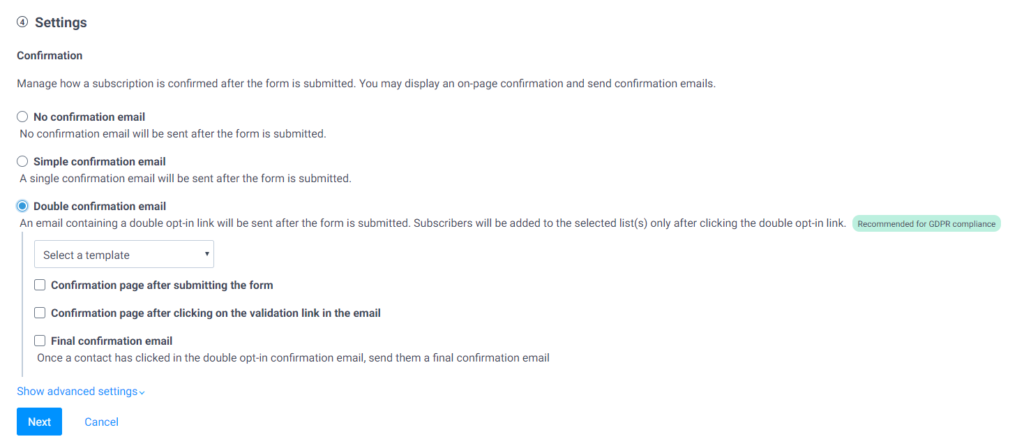
This lets you manage how the subscription confirmation will be communicated to the subscriber. You can either use an on-page confirmation and/or send a customized confirmation email.
A double opt-in confirmation email is recommended for GDPR compliance.

Step 5. Add the signup form to your website and other places
Location is everything. You want your form to be as visible as possible so that, whenever a user is browsing your website or reading your blog, they can’t miss it. Here are the key signup form hotspots:
Homepage
It sounds obvious, but this prime location is often overlooked. There is every chance that a user will bounce from your website without even exploring beyond the homepage. This doesn’t mean they’re not interested, but they may have already found the information they were looking for.
Make sure you provide the opportunity to subscribe to your newsletter before they go: place the signup form somewhere visible, for example in the sidebar, header or even footer.
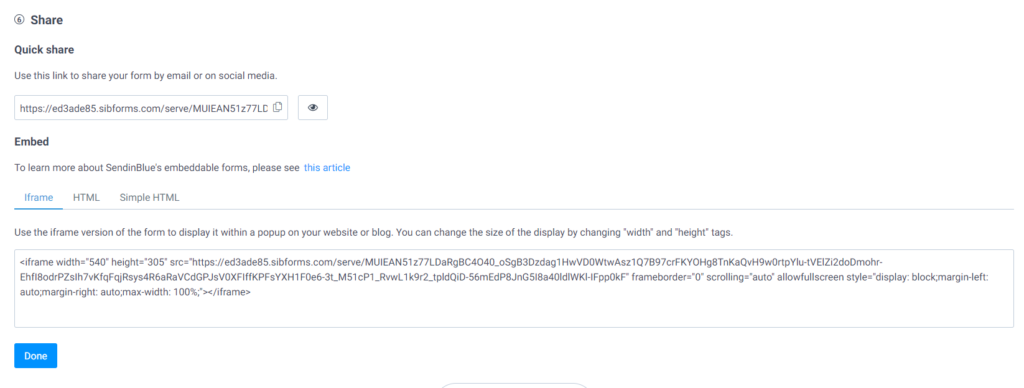
Adding the signup form to your website is easy. Once you’ve saved the form on Sendinblue, the next step is Share where you’ll find the code to be embedded on your site. Simply past the code onto your website and the form will appear.

Affiliate Disclosure: Some of the links are affiliate links. If you do decide to use these links, we may receive a commission (at no additional cost to you). This helps support the blog and allows us to continue to make free content. We only recommend products that we use and trust. If you need more info on any of these resources, feel free to contact us.


